How to Build a Chatbot: Step-by-Step Guide for Beginners
So, you're thinking about adding a chatbot to your WordPress site. The basic idea is simple: you install a plugin like MxChat, hook it up to an AI model, and then give it all the necessary information about your business. Once it's set up, it can answer visitor questions on its own, turning your website into a sales and support powerhouse that never sleeps. The best part? You can often do it all without touching a single line of code.
Why a Chatbot Is Your Next Smart Move

Before we jump into the "how-to," let's talk about the "why." Adding an AI assistant is more than just a neat new feature—it completely changes how your website connects with every single person who lands on it.
Think about being able to capture leads and answer questions in an instant, even in the middle of the night when your whole team is offline. That's the real power of a well-built chatbot. It becomes your tireless digital employee, always on and ready to help.
The Real-World Impact on Your Business
Let's look at a few common situations where a chatbot can make a huge difference right away. If you run an eCommerce store, it can ask a few questions and guide a shopper to the exact product they need. It can also handle common queries about shipping or check an order's status without anyone lifting a finger.
For a service-based business, a chatbot is a game-changer for lead qualification. It can ask targeted questions to filter visitors, which means your sales team can spend their time on conversations that are far more likely to convert.
The benefits go well beyond just Q&A. A good chatbot can:
- Provide 24/7 Support: Offer immediate help to users in any time zone, which is a massive win for customer satisfaction.
- Generate Leads After Hours: Never miss an opportunity. The bot can grab contact details from interested visitors while you sleep.
- Boost User Engagement: Act as a helpful guide, pointing visitors to the right pages, which helps reduce bounce rates and keeps them on your site longer.
From a numbers perspective, the return is hard to ignore. Automating customer service can slash operational costs by up to 92%. According to data from Exploding Topics, that works out to saving about $4.13 per interaction compared to a human agent. This isn't just a cool tech toy; it's a serious financial opportunity.
At the end of the day, launching a chatbot is one of the most effective ways to improve your website's performance. By taking over the routine stuff, it frees up your team to focus on the bigger-picture work that truly drives growth. For a deeper dive, check out our guide on the benefits of chatbots for business.
Getting Started with MxChat on WordPress
Alright, you see the value in adding an AI assistant to your site. Now for the fun part: actually bringing it to life. This is where we get hands-on and start the process of building a chatbot right inside WordPress. The great news is that getting started with MxChat is surprisingly simple, even if you don't have a technical bone in your body. We'll kick things off by adding the plugin, and then we'll dive into the basic settings that shape your bot's core behavior.
Your first move is to install the MxChat plugin. Just head over to your WordPress dashboard, navigate to the "Plugins" section, and click "Add New". A quick search for "MxChat" will bring it right up. Click "Install Now," then "Activate," and you're good to go.
Running the Configuration Wizard
Once the plugin is active, you'll see a prompt to run the configuration wizard. Think of this as your guided tour for the initial setup. It's designed to connect your MxChat account and help you make those first crucial decisions about your bot's identity, all while handling the technical API stuff in the background.
This is where you'll link your account, give your chatbot a name, and write its first greeting. That initial message is your bot's first impression, so try to make it welcoming and a good fit for your brand's voice.
My Two Cents: Don't stress too much about getting every setting perfect right away. The beauty of a system like this is that everything—from the bot's name to its welcome message—can be tweaked later. Your main goal here is just to get a solid foundation in place.
This quick workflow breaks down the three core stages you'll go through, from installation to launch.
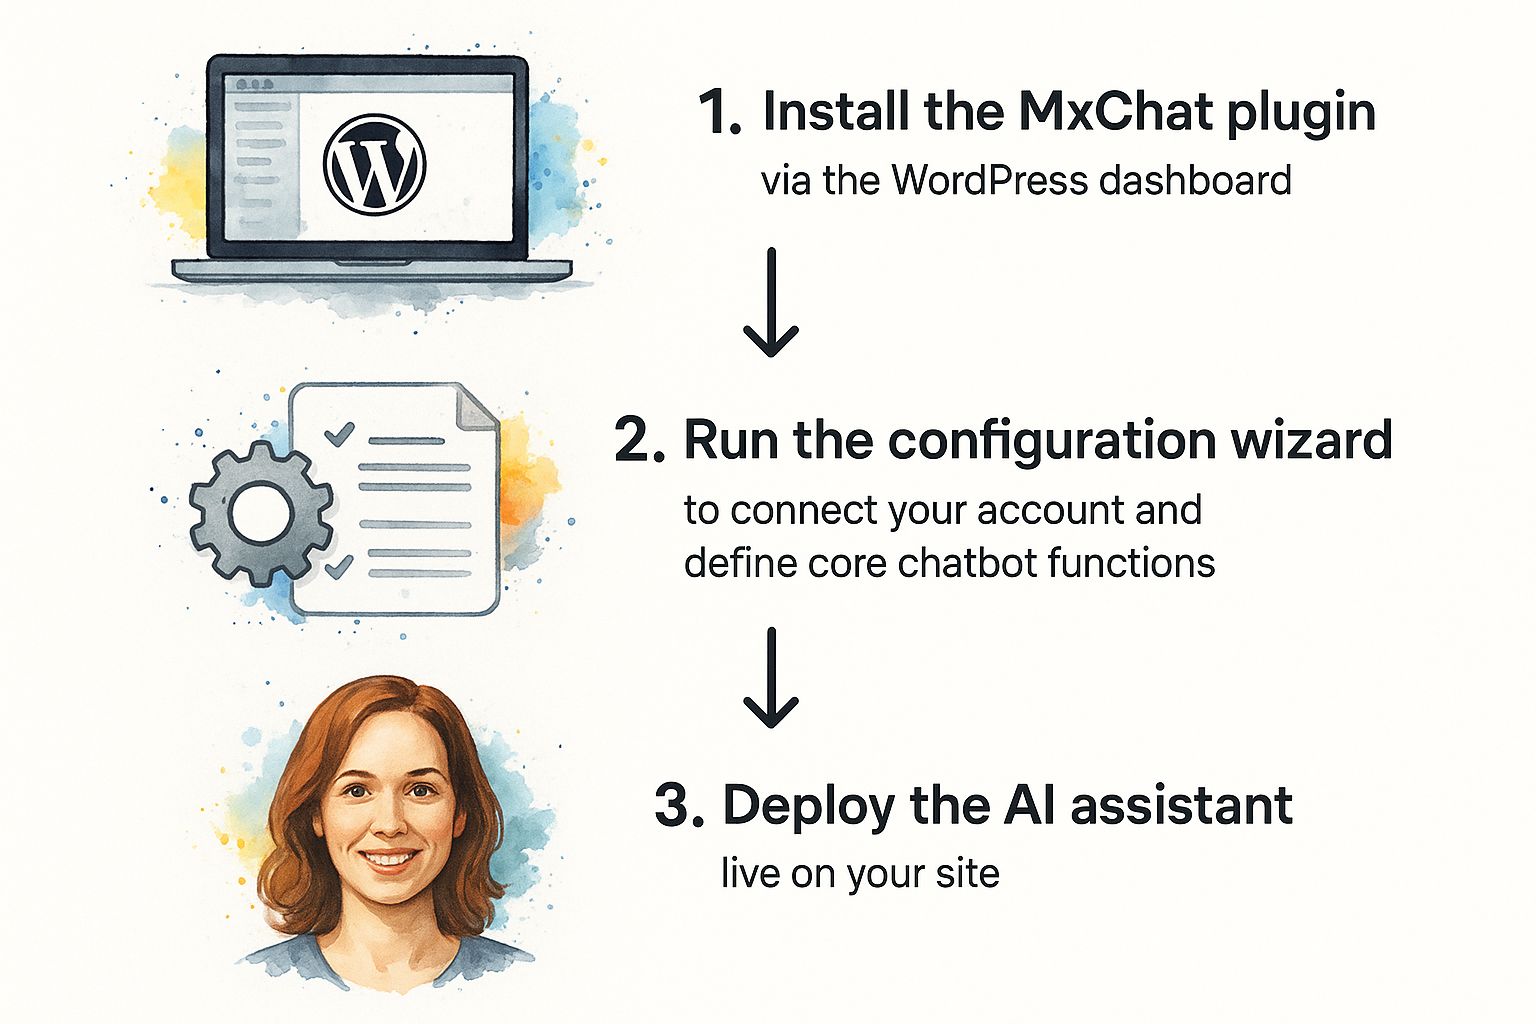
As you can see, getting from a basic WordPress site to one with a functioning AI assistant is a pretty straightforward path. This whole approach is designed to eliminate the guesswork. If you want an even deeper dive, our full guide on how to add an AI chatbot to WordPress with MxChat has you covered.
Finalizing Your Initial Setup
After you finish the wizard, your chatbot is technically live, but it's essentially a blank slate. The last thing to do in this phase is a quick check of the settings to make sure everything is connected correctly. You'll land on the MxChat dashboard right inside WordPress, which will become your command center for all the customizations we'll be making later.
With that, you've successfully laid the groundwork. Your chatbot is installed, activated, and ready to be shaped with your company's unique knowledge. And that's exactly what we're going to tackle next.
Building an Intelligent Knowledge Base
Let's be honest, a chatbot is only as smart as the information you give it. Without a solid foundation of knowledge, even the most sophisticated AI is just guessing. This is where we go beyond a basic setup and start building a chatbot that actually knows your business inside and out.
MxChat’s secret sauce is a technology called Retrieval-Augmented Generation (RAG). It sounds complicated, but the idea is simple. Instead of just relying on its general programming, the AI first “retrieves” relevant information directly from your specific documents and website content. Only then does it use that context to generate a precise, factual answer.
This is a game-changer because it stops the chatbot from "hallucinating" or making things up—a common problem with AI. Every response is grounded in the facts you provide, so your users get reliable information every single time. We're essentially building a custom digital brain for your AI assistant.
Feeding Your Chatbot the Right Information
So, how do we populate this brain? MxChat gives you two straightforward ways to feed it information, and you can mix and match them to build a really comprehensive knowledge base.
- Document Uploads: This is your go-to for structured, offline information. Think PDFs, DOCX, and TXT files. It's perfect for things that don't live on a public webpage.
- Website Crawling: This is the "set it and forget it" option. It automatically scans your entire website, indexing content from your pages and posts to answer general questions about your business.
Let’s imagine you run a B2B SaaS company. You could upload your detailed technical specification PDFs and user manuals. When a customer asks, "How do I integrate with the API?" the chatbot pulls the exact steps from those documents, not some generic answer it found online.
Or, if you run an online store, the website crawler can index all your product pages. This lets the bot answer specific questions like, "What is the return policy for electronics?" or "Do you offer free shipping on orders over $50?" by referencing the live content right from your site.
Knowledge Base Source Comparison
Choosing what content to feed your chatbot is one of the most important decisions you'll make. The sources you select will directly define how helpful—or unhelpful—it is. This table breaks down the common options to help you decide where to start.
| Source Type | Best For | Setup Effort | Update Frequency |
|---|---|---|---|
| PDF Guides | Technical manuals, product brochures, in-depth reports | Low | Infrequent (Manual Re-upload) |
| TXT/DOCX Files | FAQs, policy documents, internal notes | Low | As needed (Manual Re-upload) |
| Website Crawl | General business info, blog posts, product pages | Very Low | Automatic (Scheduled Syncs) |
A well-rounded chatbot often uses a mix of these sources to cover all its bases.
I've seen a lot of people make the mistake of trying to upload everything they've ever written on day one. Don't do that. Start small. Pick your most critical documents—maybe your top 5-10 FAQs or your single most important product manual. You can always expand the knowledge base later as you see what kinds of questions people are actually asking.
This focused approach turns your chatbot into an expert on the topics that matter most to your customers first. By creating this rich, relevant foundation, you're setting your AI up to handle a huge range of questions with confidence and accuracy.
For a deeper dive, check out this guide on how a knowledge base chatbot can enhance your WordPress site. It offers more great strategies for curating the perfect information library for your AI.
Crafting Your Chatbot's Brand Personality
Okay, your chatbot is now smart—it has access to your company’s knowledge. The next big step is giving it a personality. This is the fun part, where you turn it from a generic tool into a genuine extension of your brand.
A bot with a distinct persona feels more authentic and engaging, which makes visitors far more likely to actually interact with it. Think about it: is your brand formal and professional, or is it more laid-back and approachable? Your AI’s tone should reflect that voice perfectly. Getting this right is what separates a frustrating robot from a helpful brand assistant people enjoy using.
Defining Your Bot's Persona
First things first, let's give your bot an identity. This means picking a name, an avatar, and a conversational style. Don't just pull something out of thin air; consider what will connect with your audience. A catchy name and a friendly avatar can make the whole experience feel less robotic and much more human.
The real magic, however, happens in the system prompt. This is basically a set of instructions you feed the AI to define its behavior and tone.
A well-crafted prompt is the single most important element in shaping your chatbot’s personality. It's where you tell it how to act. I’ve found that being direct and specific works best—clearly state the desired tone, whether it's humorous, professional, or empathetic.
You can tell it to keep its answers short and sweet or to provide more detailed explanations. For instance, a simple prompt like, "Respond in a casual, helpful tone. Be brief and friendly, and always encourage the user to ask more questions if they seem unsure," can completely change the feel of the conversation.
Customizing the Visual Experience
Beyond how it talks, what the chatbot looks like is critical for making it feel like a natural part of your website. A chat widget that clashes with your site’s design sticks out like a sore thumb and can look unprofessional. Luckily, you can tweak just about every visual element to create a seamless experience.
Here are the key things you can adjust in MxChat to match your brand identity:
- Color Schemes: Change the widget’s header, background, and text colors to perfectly match your brand’s palette.
- Welcome Message: Write a compelling opening line that greets visitors and lets them know what the bot can do for them.
- Avatar: Upload a custom image. This could be your company logo, a friendly stock photo, or a unique icon that represents your brand.
For example, a law firm would probably stick with a muted color scheme, a formal welcome message ("How can we assist you today?"), and a simple logo for the avatar. An online gaming store, on the other hand, could go wild with bright, vibrant colors and a playful, character-based avatar.
These visual decisions set the tone before a single word is typed. By thoughtfully customizing both the personality and the appearance, you create a cohesive experience that builds trust and keeps people talking.
Testing and Launching Your AI Assistant
You’ve done the heavy lifting—you've built an intelligent knowledge base and sculpted the perfect brand personality. Now comes the moment of truth before your chatbot goes public: testing.
Skipping this step is a classic mistake. It's like launching a ship without checking for leaks. A smooth rollout depends entirely on making sure your bot performs exactly as you expect under real-world pressure. This isn't just about asking a few basic questions; it's about pushing the bot's limits to find and fix the weak spots before your visitors do.
The goal here is to transform your promising prototype into a polished, dependable assistant that actually improves the user experience.
Your Pre-Launch Testing Playbook
The MxChat preview environment is your private sandbox for all of this. It gives you a way to interact with your bot just like a real user would, but without making it visible on your live site. This is where you'll spend some quality time refining responses, spotting knowledge gaps, and making sure the conversational flow feels natural.
I always recommend starting with a checklist of common scenarios. You need to put yourself in your customer's shoes and ask the questions they’re most likely to have.
- Knowledge Base Queries: Fire away with questions that should pull directly from the documents you uploaded. Think things like, "What is your return policy?" or "How do I reset my password?"
- Conversational Greetings: Just say "hi." How does the bot respond? Does the welcome message make sense and set the right tone?
- Unexpected Inputs: Now, try to break it. Use slang, misspell words, or ask completely off-the-wall questions. A well-configured bot should handle confusion gracefully, maybe by saying, "I'm not sure how to help with that, but I can answer questions about…"
Pro Tip: Go through your existing support tickets or customer emails and pull out the most frequently asked questions. Use these to build your initial test script. This grounds your entire testing process in real user needs and makes your chatbot valuable from day one.
By running through these kinds of interactions, you'll quickly spot awkward phrasing or incorrect answers. Then you can jump back into your settings to tweak the knowledge base or refine your system prompt. For a much deeper dive into this, our guide on how chatbot testing can help boost engagement and user satisfaction is a fantastic resource.
Going Live with Confidence
Once you feel good about how the bot is performing in the preview, you're ready to deploy it. The final step couldn't be simpler: it's literally just a single click in your MxChat settings to enable the chatbot on your live WordPress site.
And that’s it! You now know how to build a chatbot that’s ready to engage visitors, answer questions, and support your business 24/7.
Just remember, launching isn't the finish line—it's the starting pistol. Keep an eye on its conversations, see what questions it struggles with, and continue to update its knowledge base to make it even smarter over time.
Got Questions? Let's Talk Chatbots
As you get ready to launch your own AI chatbot, you're bound to have a few questions. That's completely normal. I've put together some answers to the most common things people ask, drawing from my own experience helping others get their chatbots up and running. Think of this as a quick guide to sidestep common hurdles and feel confident from day one.
How Much Technical Skill Do I Actually Need?
This is the big one, and the answer usually surprises people: you really don't need to be a developer. If you're comfortable inside your WordPress dashboard and know how to upload a file, you've got this.
Modern tools like MxChat were built specifically for people who don't want to write code. The entire setup happens through a simple, visual interface. Your job isn't to wrestle with APIs; it's to focus on what matters—giving the bot good information and shaping its personality. It's more of a strategic role than a technical one.
How Do I Keep the Chatbot Accurate Over Time?
An AI chatbot isn't something you can just set up and walk away from. Its value is directly tied to how current its knowledge is. You have to keep it fed with fresh, accurate information to keep it useful.
Think of it like tending a small garden. You have to pull the weeds (outdated info) and plant new seeds (updated content).
- Check the conversation logs. This is your best source of feedback. See what questions people are asking. If your bot is constantly getting stumped on the same topic, that’s your cue to add that info to its knowledge base.
- Update your core documents. When a product spec changes or you update a company policy, make sure you swap out the old file in your chatbot’s knowledge source for the new one.
- Let the website crawler do the heavy lifting. For general content, the automatic crawler is a lifesaver. It keeps the bot in sync with your website's pages and blog posts, so as you update your site, your bot gets smarter automatically.
Here's a pro tip: Block out 30 minutes on your calendar once a month to review your chatbot’s performance and knowledge base. This simple habit is the best way to prevent your bot from giving out stale information and eroding user trust.
How Can I Make My Chatbot Sound More… Human?
Getting your chatbot to sound less like a machine comes down to how you define its personality. The single most powerful tool you have here is the system prompt. This is where you give the AI direct orders on how it should behave.
Don't just leave it generic. Get specific. Instead of "be helpful," try something like: "You are a friendly and enthusiastic support specialist. Keep your answers brief and use emojis where appropriate. Always sound encouraging." A few well-chosen words here can completely change the feel of the conversation.
The visual touches also make a huge difference psychologically. Give your bot a name, a friendly avatar, and a warm welcome message. These details make it feel like a genuine member of your team instead of just a piece of software. It’s the little things that really elevate the user's experience.
Ready to build a smarter, more engaging website experience without the technical headaches? Get started with MxChat today and launch your own intelligent AI assistant in minutes. https://mxchat.ai