AI Chatbot Integration with WordPress: A 2026 Guide
In 2026, an intelligent, responsive digital presence isn’t just an advantage—it’s an expectation. As customers demand instant answers and personalized experiences, simplifying AI chatbot integration with WordPress has become a crucial strategy for businesses of all sizes. Integrating a smart chatbot can transform your website from a static brochure into a dynamic, 24/7 engagement hub, capturing leads and delighting visitors while you focus on growing your business.
This guide will walk you through the essential steps to seamlessly add a powerful AI agent to your WordPress site, ensuring you can leverage this technology effectively.
Why Integrate an AI Chatbot with Your WordPress Site in 2026?
Before diving into the ‘how,’ let’s clarify the ‘why.’ The AI landscape has matured significantly, and modern chatbots are far more than simple, pre-programmed responders. They are sophisticated tools that drive tangible business results.
- 24/7 Automated Customer Support: Your business never sleeps, and neither should your support. An AI chatbot can answer common questions, troubleshoot issues, and guide users at any time of day or night.
- Enhanced Lead Generation: Chatbots can proactively engage visitors, qualify leads by asking relevant questions, and even schedule appointments, directly boosting your sales pipeline.
- Reduced Operational Costs: By automating responses to 80% of routine inquiries, you free up your human support team to handle more complex, high-value interactions.
- Personalized User Experiences: Advanced AI can analyze user behavior and provide tailored recommendations, product information, and content, making each visitor feel uniquely valued.
A Step-by-Step Guide to AI Chatbot Integration with WordPress
Adding an AI assistant to your site is more straightforward than ever, thanks to powerful, user-friendly plugins. Here’s how to get it done.

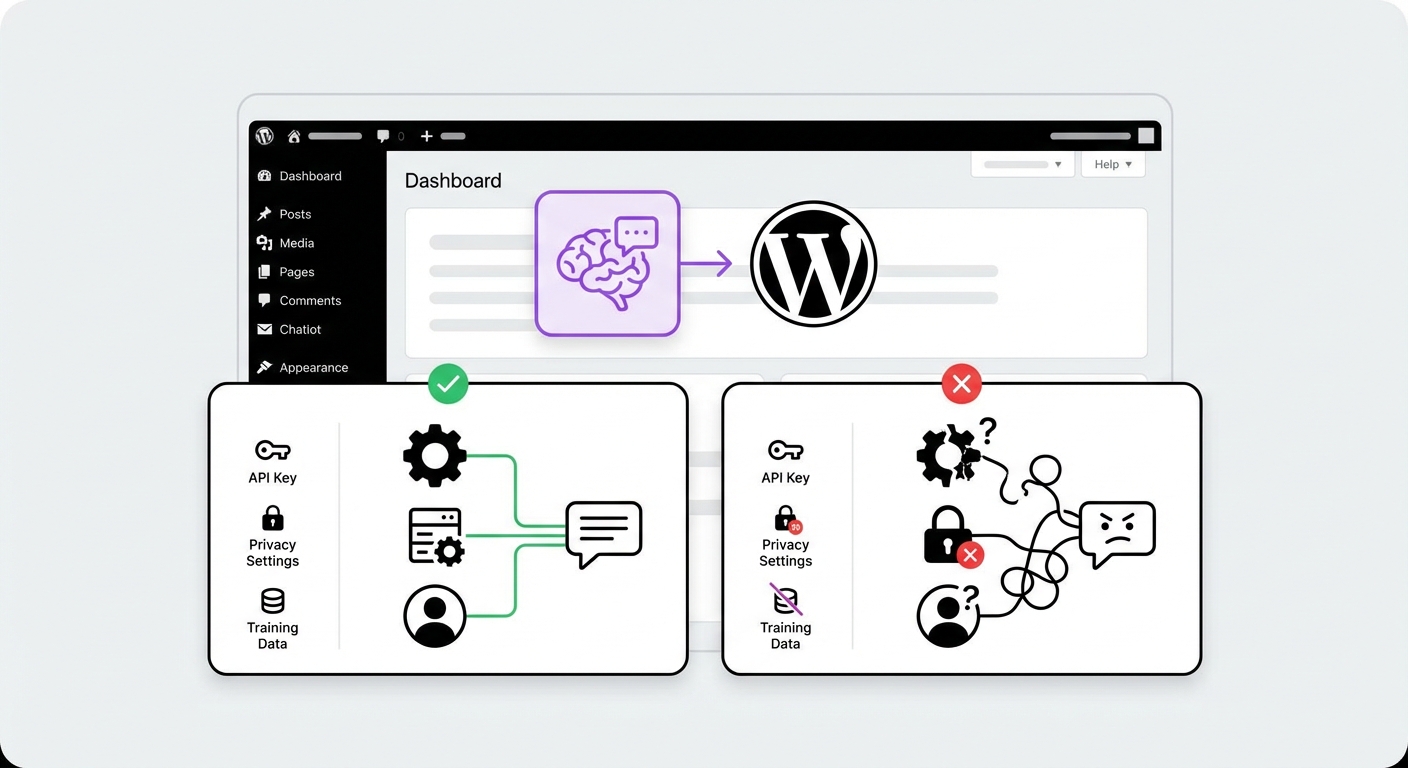
Step 1: Choose the Right AI Chatbot Platform
The foundation of a successful AI chatbot integration with WordPress is selecting the right tool. In 2026, the market is filled with options, but not all are created equal. Look for a platform that offers:
- Deep WordPress Compatibility: A solution built specifically for WordPress will ensure seamless integration, better performance, and adherence to WordPress best practices.
- No-Code Interface: You shouldn’t need a developer to build, train, and manage your chatbot. A drag-and-drop or simple form-based interface is essential for accessibility.
- Advanced AI Technology: Look for features like RAG (Retrieval-Augmented Generation). This allows the AI to pull precise, context-aware answers directly from your own knowledge base, ensuring accuracy.
- Scalability: Your chosen platform should grow with you, allowing you to create unlimited chatbots and handle increasing traffic without a hitch.
Step 2: Install and Activate the Plugin
Once you’ve chosen your platform, the initial setup is typically as simple as installing any other WordPress plugin.
- Navigate to your WordPress dashboard.
- Go to Plugins > Add New.
- Search for your chosen chatbot plugin (e.g., MxChat) or upload the plugin file if you downloaded it from the provider’s website.
- Click Install Now, and then Activate.
Step 3: Configure Your First AI Agent
This is where you bring your chatbot to life. Your platform’s dashboard will guide you through creating a new AI agent or bot.
- Give it a Name and Persona: Decide on a name (e.g., ‘Support Bot,’ ‘Helpful Harry’) and a personality. Should it be professional, friendly, or witty? A consistent tone that matches your brand is key.
- Set the Base Prompt: Define the chatbot’s core function. For example: “You are a friendly and helpful customer support agent for [Your Company Name]. Your goal is to answer user questions based on the provided knowledge base.”
- Choose an AI Model: Modern platforms often let you choose from different AI models (like GPT-4, Claude 3, etc.) to find the best fit for your needs in terms of speed, accuracy, and cost.
Step 4: Train Your Chatbot with Your Data
An untrained chatbot is like an employee on their first day—it doesn’t know anything specific about your business. The training process is the most critical step for ensuring your bot is actually helpful.
This is where RAG technology shines. Platforms such as MxChat leverage advanced RAG to ensure the AI doesn’t ‘hallucinate’ or make up answers. You can feed it information by:
- Uploading documents (FAQs, product manuals, policy PDFs)
- Pasting text directly
- Syncing it with your website pages and posts
Step 5: Customize the Chatbot’s Appearance
Your chatbot should feel like a natural part of your website, not a tacked-on widget. Good platforms offer extensive customization options.
- Colors: Match the chat window, buttons, and text to your brand’s color palette.
- Avatar: Upload your company logo or a custom avatar for the bot.
- Welcome Message: Craft a compelling opening message that encourages users to engage.
- Placement: Decide where the chat icon should appear on your site (typically the bottom-right corner).
Step 6: Deploy and Test the Chatbot
With your bot configured and trained, it’s time to go live. Most plugins allow you to deploy the chatbot globally across your entire site with a single click. You can also use shortcodes to place it on specific pages.
Warning: Do not skip testing! Interact with the chatbot as a real customer would. Ask it simple questions, complex questions, and even questions you know are outside its knowledge base to see how it responds. Use these interactions to refine its training data and prompts.
Common Mistakes to Avoid During WordPress AI Chat Setup
Even with a simple process, there are pitfalls to watch out for. Avoid these common errors:
- Forgetting a Human Handoff: The AI won’t be able to answer everything. Always provide a clear way for users to connect with a human agent, whether through a contact form, email, or live chat takeover.
- Using a Generic Personality: A bot that says “I am a large language model” breaks the user experience. Invest time in creating a persona that reflects your brand.
- A ‘Set It and Forget It’ Mentality: Regularly review chat logs to see what questions users are asking. Use this data to update your knowledge base and improve the bot’s performance.
- Poorly Sourced Knowledge: Don’t upload outdated documents. Your chatbot is only as good as the information you give it. Ensure its knowledge base is current and accurate.
What to Expect After a Successful Integration
Once your AI chatbot is up and running, you should start seeing positive results relatively quickly. Key outcomes include:
- Increased Engagement: Metrics like time-on-page and pages-per-session often improve as users interact with the bot.
- Higher Conversion Rates: A well-trained bot can guide users to purchase, capture email addresses, and book demos, directly impacting your bottom line.
- Reduced Support Tickets: You’ll notice a significant drop in repetitive, low-level support queries, freeing up your team.
- Valuable Customer Insights: Chat logs are a goldmine of information, revealing your customers’ pain points, interests, and unanswered questions.
Conclusion: Elevate Your WordPress Site with Smart AI
In 2026, mastering AI chatbot integration with WordPress is no longer an option for the tech-savvy few; it’s a fundamental component of a successful digital strategy. By following these steps, you can deploy an intelligent assistant that enhances user experience, drives conversions, and streamlines your operations.
The key is to choose a tool that makes this process simple, powerful, and deeply integrated with the WordPress ecosystem. For those seeking a robust, no-code solution designed from the ground up for WordPress, exploring a platform like MxChat can provide a seamless path to leveraging AI and gaining a significant competitive advantage.